
What's inside this article:
- Basic information
- Get your background image
- Upload your background image
- Configure your title graphic in Pangea CMS
- Preview your title graphic
- Publish your title graphic
Basic information
This article explains how to display title graphics on section pages.
What is a title graphic?
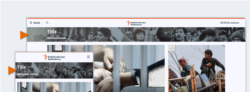
A title graphic is a full-width graphic that connects to the bottom of the site header. It displays the main page title over a background image, replacing the plain text title.
Which pages can show title graphics?
You can show a title graphic on any standalone section page except the homepage.
Title graphics are not currently supported on category pages. Sections that are merged with categories display as part of the category page, so they cannot show title graphics. For more details, see our guide on merging sections and categories.
What can you add to a title graphic?
Every title graphic includes the following elements:
- (A): Background image: A 3000 x 500 pixel image.
- (B): Title: The main page title, as set in Pangea CMS.

A title graphic can also include:
- (C): Date and time stamp: When the page was last updated. This information is automatically displayed in title graphics if enabled for section pages site-wide.
- (D): Subtitle: A subtitle with further details about the topic of the page. You can add a subtitle when you configure the graphic in Pangea CMS.

Get your background image
Every title graphic requires a background image. The first step is to get this image. Two options are available:
Work with Pangea Design
The Pangea Design team can create background images for new title graphics on request. To contact us, click the link below:
Share the specific photo / image you would like to use, or describe your vision. We will prepare the image following your requirements and notify you when it is ready.
Create the image yourself
Prepare a 3000 x 500 pixel image. This resolution ensures good visual quality across different devices (mobile, tablet, and desktop).
You should prepare just the plain image. Pangea will automatically add the text overlay and opacity layer. More details are available below.
Background image guidelines
On the public site, the background image is cropped to fit the screen size. To ensure key details are not cropped, place them inside the vertical center of the image. This means inside the middle horizontal band.
Horizontal cropping is customizable using the Image focal point setting in Pangea CMS. This means that you do not need to centralize key details horizontally.
The diagrams below show cropping for a 3000 x 500 px image on mobile and desktop. In these examples, horizontal cropping follows the default image focal point value in Pangea CMS (65% from the left edge).
Mobile cropping:

Desktop cropping:

You might prepare an image with a clear focal point (such as a face). To ensure the focal point is not covered by text, place it as follows:
- Toward the right side on LTR (Left-To-Right) sites.
- Toward the left side on RTL (Right-To-Left) sites.
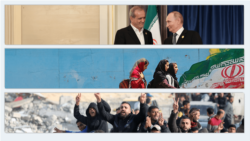
The image does not need to have a clear focal point. You might also prepare an image with details along the full width (such as a crowd).

Design templates
If you have Adobe Express or Photoshop access, you can use our ready-made templates to prepare background images:
Upload your background image
After creating a background image, you need to upload it to Pangea. For detailed instructions, see the following article:
During upload, it is required to add the image Source. This will be used for internal organization and won't be visible on the published graphic.
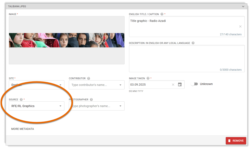
We recommend using the same source for all title graphics. You might use an existing source (for example, 'RFE/RL Graphics'). If your entity will require a new source for this purpose, please contact Pangea Customer Care.
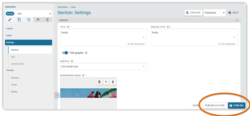
Configure your title graphic in Pangea CMS
To configure a title graphic for a section page:
- Go to Build > Sections.
- Select the section page where you want to show the title graphic.
- Go to Settings > General > Title graphic.
- Enable the feature and adjust your settings.
The following settings are available when you configure a title graphic:
Title
A title graphic always shows the main page title (set under Title). In most cases, you should not need to change the title.
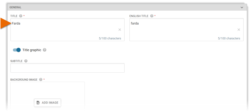
Subtitle
Under Subtitle, optionally enter a subtitle. This will display in the graphic below the title in a smaller font. The subtitle builds on the title by offering visitors more details about the topic of the page. We recommend keeping the subtitle as short as possible. (A few words should be sufficient in most cases.)
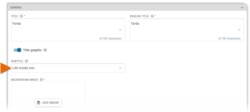
Background image
Under Background image, select Add image. You can then search for and select the background image that was prepared specially for this title graphic.

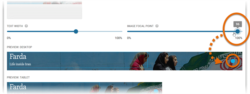
Text width
Under Text width, set the width of the text box. This controls what % of the image can be covered by text (60% by default). After this point, any additional text will be pushed onto a new line.
The current text width is marked by the blue box on the preview. Change the width by dragging the slider backwards and forwards. You might make the following adjustments:
- Decrease the width to stop the text covering key visual details at the end of the image.
- Increase the width to stop the text occupying two lines. This is useful if the text is longer and the image has no clear focal point.
TIP: Check the preview before and after making changes to the text width.
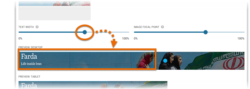
Image focal point
Under Image focal point, specify the focal point of the image (if the image has a clear focal point). The focal point is the most meaningful part of the image. When the page is viewed on a device with a smaller screen, the focal point has priority and will remain visible. Other parts of the image are cropped to fit the smaller screen.
The current focal point is marked by the blue dot on the preview. Change the focal point by dragging the slider backwards and forwards. If the image has no clear focal point, you can leave the default setting (65%).
TIP: Check the preview before and after making changes to the focal point.
Preview your title graphic
You can preview how the title graphic will look on the published page. A preview for each device type (mobile, tablet, and desktop) appears at the bottom of the settings. Before you publish a new title graphic, closely check the preview for each device.
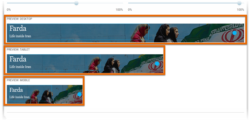
The previews will update continuously as you adjust the settings. You do not need to save your changes before checking them in the preview.
Publish your title graphic
When you are ready to publish the title graphic, click Publish or Publish & close.
The title graphic is now published. Because of the caching rules that are configured for all Pangea websites, it might take up to 5 minutes before the change appears in your web browser. For more details, visit the following article:

